Wallet Token
Overview
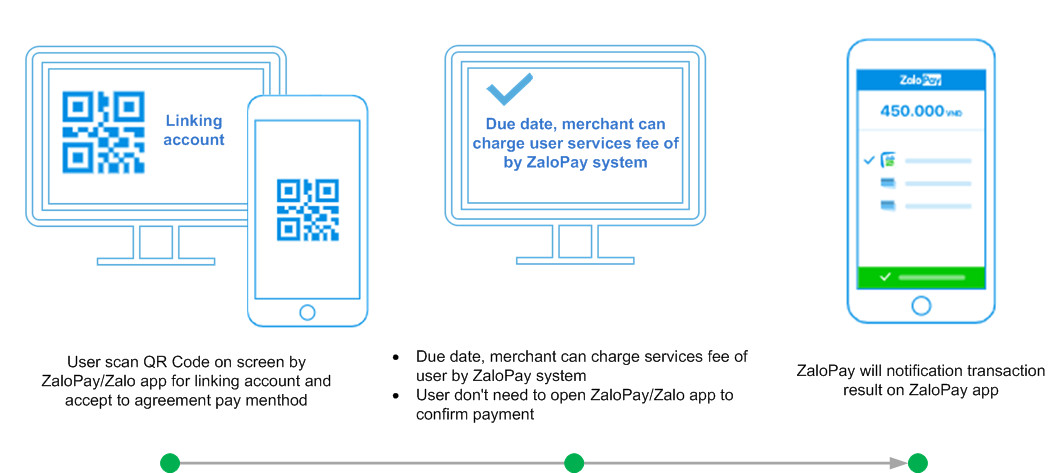
Auto Debit is a payment solution which allows merchants can debit money from user balances, accounts automatically after a user signed up for an agreement.
In the next sections, we guide you step by step to integrate Zalopay. You can try out our live demo application to get a quick overview. A complete example implementation (with NextJs) is in the Github repository.
Prerequisites
Before you begin, make sure the following works done for a smooth integration:
Registered merchant account successfully and obtained
app_id,mac_keyfrom Merchant Portal.Understood the usage and specification of following APIs:
The concept of callback and secure data transmission.
How it works
The payment flow is as below:
Integration
This section focuses on how to integrate auto-debit flow from Zalopay. A typical workflow includes the following steps:
- Initiate a binding.
- Pay using token.
- Unbind an agreement.
- Query user information.
Step 1. Initiate a binding
To user can checkout using the auto-debit feature, the merchant must first initiate a request to create a new binding for an agreement that links your user Zalopay account with your application.
From your server, call
CreateBinding API. For more specifying, please refer to the API Explorer for other critical parameters.Here's an example of how you create a binding for an agreement:
src/api/agreement/bind/index.js// For a working example, please navigate to:
// https://github.com/zalopay-samples/quickstart-nextjs-tokenized-payment
import axios from "axios";
import CryptoJS from "crypto-js";
import {API_ROUTES, configZLP, ZLP_API_PATH} from "../../config";
export default async function handler(req, res) {
if (req.method === 'POST') {
try {
const binding_data = {};
const bind = {
app_id: configZLP.app_id,
app_trans_id: req.body.appTransID,
req_date: Date.now(), // milliseconds
identifier: "ZLP User",
max_amount: 0,
binding_type: 'WALLET',
binding_data: JSON.stringify(binding_data),
callback_url: configZLP.host + API_ROUTES.AGREEMENT_CALLBACK,
redirect_url: "http://localhost:3000/cart" // testing purpose
};
// appid|app_trans_id|appuser|amount|apptime|embeddata|item
const data = configZLP.app_id + "|" + bind.app_trans_id + "|" + bind.binding_data + "|" + bind.binding_type + "|" + bind.identifier + "|" + bind.max_amount + "|" + bind.req_date;
bind.mac = CryptoJS.HmacSHA256(data, configZLP.key1).toString();
axios.post(configZLP.zlp_endpoint + ZLP_API_PATH.AGREEMENT_BINDING, null, {params: bind})
.then(result => {
if (result.data.return_code === 1) {
res.status(200).json({
binding_token: result.data.binding_token,
binding_qr_link: result.data.binding_qr_link // web-based scenario
});
} else {
res.status(200).json({
error: true,
error_code: result.data.sub_return_code,
message: result.data.sub_return_message
});
}
})
.catch(err => console.log(err));
} catch (err) {
res.status(500).json({statusCode: 500, message: err.message});
}
} else {
res.setHeader('Allow', 'POST');
res.status(405).end('Method Not Allowed');
}
}After you would receive a response like this:
{
  "return_code": 1,
  "return_message": "...",
  "sub_return_code": 1,
  "sub_return_message": "...",
  "binding_token": "220428XjNBVZQ7gD2ebs2gVL1E87MBVp",
  "deep_link": "zalopay://launch/app/730?view=authorize&b=220428XjNBVZQ7gD2ebs2gVL1E87MBVp",
  "binding_qr_link": "https://sbbinding.zalopay.vn?binding_token=220428XjNBVZQ7gD2ebs2gVL1E87MBVp",
  "short_link": "https://zlpmcagp.zalopay.vn/oauthbe/agreement/220428XjNBVZQ7gD2ebs2gVL1E87MBVp"
}
Present binding QR code
The binding response includes links that the merchant needs to navigate to the user can confirm the binding based on the merchant platform:
deep_link: The link for confirming the agreement in the mobile scenario.binding_qr_link: The URL for the user confirming the agreement in the web scenario. Zalopay has generated a QR code for the merchant.short_link: The URL for the user agreement in the web scenario. The merchant needs to generate a QR from this link.
After confirmation, Zalopay will redirect to the merchant website or merchant app with params:
Params Data type Max length Description binding_id String 64 The ID of the binding token has been approved to auto-debit. status Int 1: Success, otherwise fail Using this
binding_idto query the binding status in case you didn't receive the binding callback from Zalopay.Receive binding result
When your user completes the binding by scanning the QR code and confirming, Zalopay will notify the binding result via callback with a POST request with
Content-Type: application/json.The callback data includes the
pay_tokenfield, which the merchant will store in the system, for later payments using this token. For more specifying:No Params Data type Max length Description 1 app_id Int The app id of the merchant. 2 app_trans_id String 40 The merchant's unique id for the binding. 3 binding_id String 64 The id of binding has been confirmed in the Zalopay system. 4 pay_token String 128 The public token is used when doing auto-debit. 5 server_time Int Server timestamp in seconds. 6 merchant_user_id String 128 The identifier field in bind request. 7 status Int Type of message:
1: The user confirms an agreement
2: The user updates the agreement8 msg_type Int 1: Success, otherwise fail 9 zp_user_id String 64 The identifier of Zalopay user per merchant app_id. 10 masked_user_phone String 20 Masked user phone (Ex: masked_user_phone: "****6938"). caution- It's important to verify that the request actually came from Zalopay by using the callback key to validate the callback's data.
- For security reasons, your callback url must have the same domain as your server.
- Your callback endpoint must be publicly accessible.
- Due to technical issues such as network timeout, your service is unavailable to serve the callback request... Zalopay may not be able to notify you via the callback.
Here are some examples of how you can do it:
src/api/callback/agreement/index.js// For a working example, please navigate to:
// https://github.com/zalopay-samples/quickstart-nextjs-tokenized-payment
import {configZLP} from "../../config";
import CryptoJS from "crypto-js";
export default async function handler(req, res) {
if (req.method === 'POST') {
try {
let result = {};
try {
let dataStr = req.body.data;
let reqMac = req.body.mac;
let dataJson = JSON.parse(dataStr, configZLP.key2);
let status = dataJson["status"];
let mac = CryptoJS.HmacSHA256(dataStr, configZLP.key2).toString();
// kiểm tra callback hợp lệ (đến từ Zalopay server)
if (reqMac !== mac) {
// callback không hợp lệ
result.return_code = -1;
result.return_message = "mac not equal";
} else {
if (status === 1) { // Confirmed
console.log("Confirmed Binding callback received!");
console.log("Please provide mechanism to store payToken=", dataJson["pay_token"]);
} else if (status === 3) { // Cancelled
console.log(`Cancelled Binding callback received!`);
} else if (status === 4) { // Disabled
console.log("Disabled Binding callback received!");
console.log("Please provide mechanism to clear agreement info");
}
result.return_code = 1;
result.return_message = "success";
}
} catch (ex) {
result.return_code = 0; // Zalopay server sẽ callback lại (tối đa 3 lần)
result.return_message = ex.message;
}
// thông báo kết quả cho Zalopay server
res.json(result);
} catch (err) {
res.status(500).json({statusCode: 500, message: err.message});
}
} else {
res.setHeader('Allow', 'POST');
res.status(405).end('Method Not Allowed');
}
}We strongly recommend that you actively query the binding status. This can be done by calling
QueryPaymentToken API.Our sample code to query the binding you just created:
src/api/agreement/query/index.jsimport axios from "axios";
import CryptoJS from "crypto-js";
import qs from "qs";
import {configZLP, ZLP_API_PATH} from "../../config";
export default async function handler(req, res) {
if (req.method === 'POST') {
try {
let postData = {
app_id: configZLP.app_id,
app_trans_id: req.body.appTransID,
req_date: Date.now(), // milliseconds
}
let data = postData.app_id + "|" + postData.app_trans_id + "|" + postData.req_date; // app_id|app_trans_id|req_date
postData.mac = CryptoJS.HmacSHA256(data, configZLP.key1).toString();
let postConfig = {
method: 'post',
url: configZLP.zlp_endpoint + ZLP_API_PATH.AGREEMENT_QUERY,
headers: {
'Content-Type': 'application/x-www-form-urlencoded'
},
data: qs.stringify(postData)
};
axios(postConfig)
.then(function (response) {
res.status(200).json(response.data);
})
.catch(function (error) {
console.log(error);
});
} catch (err) {
res.status(500).json({statusCode: 500, message: err.message});
}
} else {
res.setHeader('Allow', 'POST');
res.status(405).end('Method Not Allowed');
}
}A binding will be expired and be marked as INVALID after 15 minutes if the user doesn't confirm or update.
- You can stop querying binding status after this time box and treat the latest status as its final status.
- If you didn't receive any callback, you could mark this binding as failed.
Step 2. Pay using token
Once a binding is established successfully and your client is ready to pay, first check if the user can pay the order by calling
QueryBalance API.Here's an example of how you would query the balance of a specified user before paying:
src/api/agreement/balance/index.js// For a working example, please navigate to:
// https://github.com/zalopay-samples/quickstart-nextjs-tokenized-payment
import axios from "axios";
import CryptoJS from "crypto-js";
import qs from "qs";
import {configZLP, ZLP_API_PATH} from "../../config";
export default async function handler(req, res) {
if (req.method === 'POST') {
try {
let postData = {
app_id: configZLP.app_id,
identifier: "ZLP User",
pay_token: req.body.payToken,
amount: req.body.amount,
req_date: Date.now(), // milliseconds
}
let data = postData.app_id + "|" + postData.pay_token + "|" + postData.identifier + "|" + postData.amount + "|" + postData.req_date; //app_id|pay_token|identifier|amount|req_date
postData.mac = CryptoJS.HmacSHA256(data, configZLP.key1).toString();
let postConfig = {
method: 'post',
url: configZLP.zlp_endpoint + ZLP_API_PATH.AGREEMENT_BALANCE,
headers: {
'Content-Type': 'application/x-www-form-urlencoded'
},
data: qs.stringify(postData)
};
axios(postConfig)
.then(function (response) {
res.status(200).json(response.data);
})
.catch(function (error) {
console.log(error);
});
} catch (err) {
res.status(500).json({statusCode: 500, message: err.message});
}
} else {
res.setHeader('Allow', 'POST');
res.status(405).end('Method Not Allowed');
}
}The response includes an array of balance detail objects containing a
payablefield that represents whether the user can make payments on a payment channel.{
"return_code": 1,
"return_message": "...",
"sub_return_code": 1,
"sub_return_message": "...",
"data": [
{
"channel": 38,
"payable": true,
"bank_code": ""
}
],
"discount_amount": 0
}You need follow below for your next step:
Return code Payable Description 1 true User can payment -> Call Pay by token API 1 false User can not payment -> Don’t call Pay by token API 2 User can not payment -> Don’t call Pay by token API
If the user can pay, call
CreateOrder APIto create an order for agreement pay.Here are some examples of how you would handle it in your backend:
/src/api/create/index.js// For a working example, please navigate to:
// https://github.com/zalopay-samples/quickstart-nextjs-dynamic-qrcode
import axios from "axios";
import CryptoJS from "crypto-js";
import moment from "moment";
import { configZLP } from "../config";
const embed_data = { zlppaymentid: "P271021" };
const items = [{}]; // todo: collect items from Cart page
const transID = Math.floor(Math.random() * 1000000);
const appTransID = `${moment().format('YYMMDD')}_${transID}`;
const order = {
app_id: configZLP.app_id,
app_trans_id: appTransID,
app_user: "user123",
app_time: Date.now(), // miliseconds
item: JSON.stringify(items),
embed_data: JSON.stringify(embed_data),
amount: 50000,
description: `Payment for the order #${transID}`,
bank_code: "zalopayapp",
callback_url: configZLP.callback_url
};
const data = [configZLP.app_id, order.app_trans_id, order.app_user, order.amount, order.app_time, order.embed_data, order.item].join("|");
order.mac = CryptoJS.HmacSHA256(data, configZLP.key1).toString();
axios.post(configZLP.endpoint + 'create', null, { params: order })
.then(result => {
res.status(200).json({
appTransID: appTransID,
url: result.data.order_url
});
})
.catch(err => console.log(err));After Zalopay accepts your payment order, you would receive a response like this:
{
  "return_code": 1,
  "return_message": "...",
  "sub_return_code": 1,
  "sub_return_message": "...",
  "zp_trans_token": "20090400000112548Y3z18",
  "order_url": "https://sbgateway.zalopay.vn/openinapp?order=eyJ6cHRyYW5zdG9rZW4iOiIyMDA5MDQwMDAwMDExMjU0OFkzejE4IiwiYXBwaWQiOjI1NTN9",
  "order_token": "ptazBLb128DJ6MSe4d-I2okWQpO7FdUwK9VA4MNqFliUIO1SM3E8ElOsum-iie61rou4A1lblWwddvCwKObzFpo0xJRX4AgP6moSsVqKsxM8K-Duix5ZdH3HFNN07fk7"
}
If you get a response with
return_codethat differs from1, consult the reference for status codes to troubleshoot.After merchants created the order for agreement pay successfully, you need to call
PayByToken APIto notify Zalopay to process payment.Here's an example of how you create a binding for an agreement:
/src/api/agreement/pay/index.js// For a working example, please navigate to:
// https://github.com/zalopay-samples/quickstart-nextjs-dynamic-qrcode
import axios from "axios";
import CryptoJS from "crypto-js";
import {configZLP, ZLP_API_PATH} from "../../config";
export default async function handler(req, res) {
if (req.method === 'POST') {
try {
const postData = {
app_id: configZLP.app_id,
identifier: "ZLP User",
pay_token: req.body.payToken,
zp_trans_token: req.body.zpTransToken,
req_date: Date.now(), // milliseconds
};
// appid|app_trans_id|appuser|amount|apptime|embeddata|item
const data = configZLP.app_id + "|" + postData.identifier + "|" + postData.zp_trans_token + "|" + postData.pay_token + "|" + postData.req_date;
postData.mac = CryptoJS.HmacSHA256(data, configZLP.key1).toString();
axios.post(configZLP.zlp_endpoint + ZLP_API_PATH.AGREEMENT_PAY, null, {params: postData})
.then(result => {
if (result.data.return_code === 1) {
res.status(200).json(result.data);
} else {
res.status(200).json({
error: true,
error_code: result.data.sub_return_code,
message: result.data.sub_return_message
});
}
})
.catch(err => console.log(err));
} catch (err) {
console.log(err)
res.status(500).json({statusCode: 500, message: err.message});
}
} else {
res.setHeader('Allow', 'POST');
res.status(405).end('Method Not Allowed');
}
}Callback agreement order
After payment has been processed successfully, a callback will be sent to the merchant for detail of the payment.
The logic to handle it same as Dynamic QR, you can refer here.
Step 3. Unbind an agreement
In case your user doesn't want to use the auto-debit feature, call Unbind API with binding_id returned when the binding is confirmed to Zalopay.
Example response:
{
 "return_code": 1,
 "return_message": "...",
 "sub_return_code": 1,
 "sub_return_message": "..."
}
Zalopay also allows unbinding (token to be provoked) from Zalopay App. In this case, the merchant will receive notify unbind sent from Zalopay through callback_url submitted in the bind request.
Step 4. Query user information
After the client confirms the agreement, you can use pay_token returned from Zalopay callback to query basic user information.
From your server, call QueryUser API.
Currently, this API only returns a masked phone of user.
Example response:
{
  "phone": "****2606",
  "return_code": 1,
  "return_message": "...",
  "sub_return_code": 1,
  "sub_return_message": "..."
}
See also
What's next
- Finish coding? Verify your integration with testing.